osTicket is an open source customer support ticket management software based on PHP and MySQL. osTicket is a help system for anyone from small companies to enterprises. With a remarkable flexibility, osTicket can be made to do just about anything you need it to do. If you need a means for help ticket submission and tracking, if you need to be able to assign tickets to staff, and alert staff and clients, you should take a good long look at this system.
osTicket Features
- Custom Fields : Customize the data collected from users when submitting a ticket to help get straight to the issue.
- Rich Text HTML Ticket Filters : Define rules to route incoming tickets to the right departments or staff members, and action triggers.
- Help Topics: Configurable help topics for web tickets. Route inquiries without exposing internal departments or priorities.
- Agent Collision Avoidance : Ticket locking mechanism to allow staff to lock tickets during response and avoid conflicting or dual responses.
- Assign and Transfer : Transfer tickets between departments to make sure it’s being handled by the correct staff. Assign tickets to a staff or to a team.
- Auto-Responder : Configurable automatic reply sent out when a new ticket is opened or a message is received.
- Internal Notes : Add internal notes to tickets for staff. Activity logs let you see events or actions that have been taken, when they took place, and by whom.
- Service Level Agreements : SLA Plans allow you to track tickets and due dates without the hassle.
- Customer Portal : All support requests and responses are archived online. User can login using email and ticket ID. No user account or registration required to submit a ticket.
- Dashboard Reports : Get system overview and basic historical statistics on tickets count and status per department, staff and help topics.
Requirements
- Web server
- PHP 4.3 (or Higher)
- MySQL 4.1 (or Higher)
- MySQL database with valid username, password and hostname
1. Install Nginx and MySQL
Install Nginx and MySQL server from the Ubuntu repository, and then enable all services to start at boot time.
Update the Ubuntu repository:
sudo apt-get update
Install Nginx and MySQL server
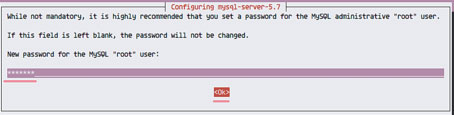
sudo apt-get install -y nginx mysql-server
You will be asked for the MySQL root password, type in a secure MySQL password.
Now start Nginx and MySQL with the following systemctl command
systemctl restart nginx
systemctl restart mysql
Add it to start at boot time:
systemctl enable nginx
systemctl enable mysql
Now make sure all the services are running by checking the server port of the services
netstat -plntu
2. Install and Configure PHP
OsTicket requires some PHP extension for the installation, including php-gd, imap, xml and mbstring. In this step, we will install PHP 7 and all of those extensions and then configure PHP to run with Nginx web server.
Install PHP 7 and all extension needed with the apt command below.
sudo apt-get install -y php7.0-cli php7.0-mysql php7.0-cgi php7.0-fpm php7.0-gd php7.0-imap php7.0-xml php7.0-mbstring php7.0-intl php-apcu
If all is done, go to the php 7 directory and edit the php.ini file
cd /etc/php/7.0/
vim fpm/php.ini (vim or nano which ever you are comfortable)
Uncomment the cgi.fix_pathinfo line and change it’s value to 0
cgi.fix_pathinfo=0
Save the file and exit vim.
Now restart php7-fpm and add it to start at the boot time
systemctl restart php7.0-fpm
systemctl enable php7.0-fpm
Next, we will configure PHP 7 FPM to work with the Nginx web server. Go to the Nginx virtual host directory and edit the default virtual host file with vim.
cd /etc/nginx/sites-available/ vim default
Uncomment the PHP 7 configuration line below
location ~ \.php$ {
include snippets/fastcgi-php.conf;
#
# # With php7.0-cgi alone:
# fastcgi_pass 127.0.0.1:9000;
# # With php7.0-fpm:
fastcgi_pass unix:/run/php/php7.0-fpm.sock;
}
Save and exit, then restart the web server
systemctl restart nginx
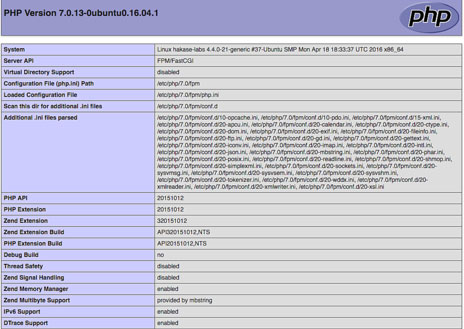
Now test PHP 7 and Nginx by creating a phpinfo file
cd /var/www/html/
echo ‘<?php phpinfo(); ?>’ > info.php
Open your web server URL in a Browser and visit the server IP address
You will get information about your php configuration
http://192.168.0.85/info.php
You will get information about your php configuration
3. Create Database for OsTicket
In this step, we will create a new database and MySQL user for OsTicket. Login to the MySQL shell with your MySQL root password
mysql -u root -p
TYPE YOUR PASSWORD
Create a new database named ‘osticket_db’, and a new user ‘osticket’ with password ‘osticketpw@’
create database osticket_db;
create user osticket@localhost identified by ‘osticketpw@’;
Grant all privileges for the new user to the database ‘osticket_db’
grant all privileges on osticket_db.* to osticket@localhost identified by ‘osticketpw@’;
flush privileges;
Database for OsTicket has been created
4. Create OsTicket Virtual Host
Now we have to a create new virtual host configuration for OsTicket Go to the Nginx virtual host directory and create a new file ‘osticket’ with vim
cd /etc/nginx/sites-available/
vim osticket
Paste the configuration below
server {
listen 80;
server_name support.techiesjournal.com;root /var/www/osticket/upload;
access_log /var/log/nginx/access.log;
error_log /var/log/nginx/error.log;index index.php;
client_max_body_size 2000M;
client_body_buffer_size 100M;
client_header_buffer_size 10M;
large_client_header_buffers 2 10M;client_body_timeout 12;
client_header_timeout 12;
keepalive_timeout 15;
send_timeout 10;gzip on;
gzip_comp_level 2;
gzip_min_length 1000;
gzip_proxied expired no-cache no-store private auth;
gzip_types text/plain application/x-javascript text/xml text/css application/xml;set $path_info “”;
location ~ /include {
deny all;
return 403;
}if ($request_uri ~ “^/api(/[^\?]+)”) {
set $path_info $1;
}location ~ ^/api/(?:tickets|tasks).*$ {
try_files $uri $uri/ /api/http.php?$query_string;
}if ($request_uri ~ “^/scp/.*\.php(/[^\?]+)”) {
set $path_info $1;
}location ~ ^/scp/ajax.php/.*$ {
try_files $uri $uri/ /scp/ajax.php?$query_string;
}location / {
try_files $uri $uri/ index.php;
}location ~ \.php$ {
fastcgi_param SCRIPT_FILENAME $document_root$fastcgi_script_name;
include fastcgi_params;
include snippets/fastcgi-php.conf;
fastcgi_pass unix:/run/php/php7.0-fpm.sock;
fastcgi_param PATH_INFO $path_info;
}
}
We will use domain name ‘support.techiesjournal.com’, and using ‘/var/www/osticket/upload’ directory as the web root directory. Replace the domain name ‘support.techiesjournal.com‘ with your own domain.
Save the Nginx configuration file and exit
Now activate the virtual host and test the configuration
ln -s /etc/nginx/sites-available/osticket /etc/nginx/sites-enabled/
nginx -t
Make sure there is no error and restart Nginx
systemctl restart nginx
5. Download and Configure osTicket
Create a new directory for osTicket and go to that directory
mkdir -p /var/www/osticket/
cd /var/www/osticket/
Download osTicket with the wget command
wget http://osticket.com/sites/default/files/download/osTicket-v1.10.zip
Extract the osTicket archive file with unzip
unzip osTicket-v1.10.zip
All osTicket web files are available on the ‘upload’ directory, go to that directory and copy the sample osticket config file
cd upload/
cp include/ost-sampleconfig.php include/ost-config.php
Now change the owner of all osticket files and directories to the ‘www-data’ user and group
cd /var/www/osticket/
chown -R www-data:www-data upload/
6. Install OsTicket
Open your web browser and visit your OsTicket domain name
http://support.techiesjournal.com
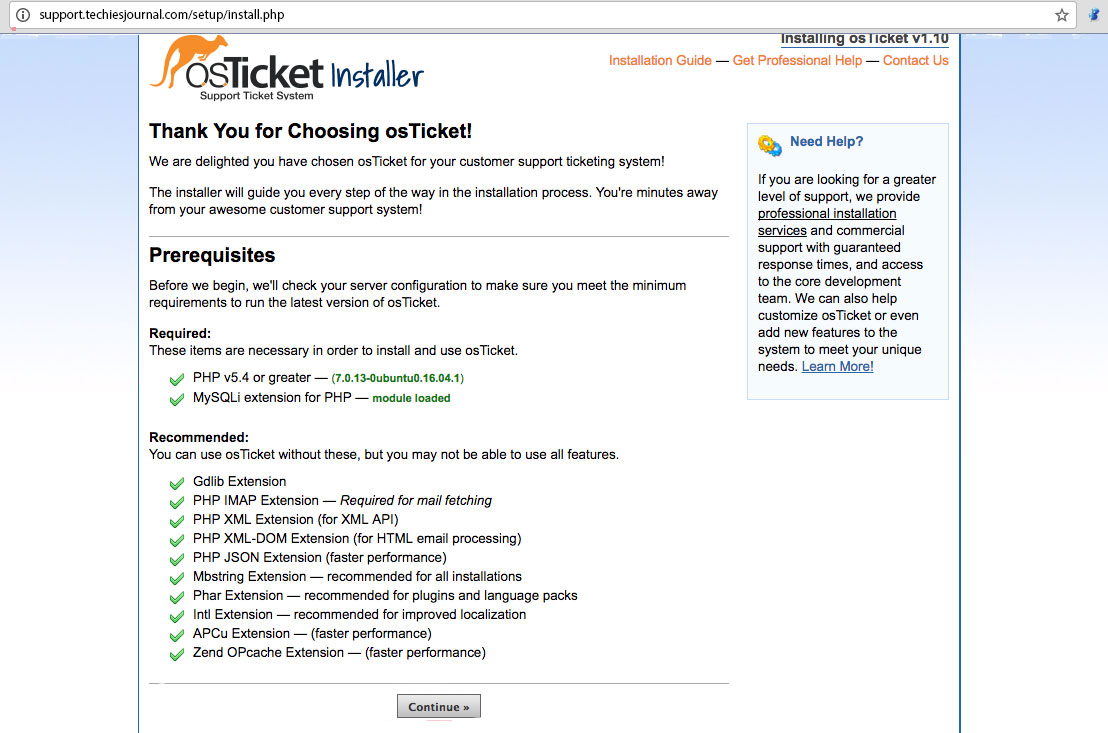
Click on ‘Continue’ and you will be redirected to the OsTicket configuration section
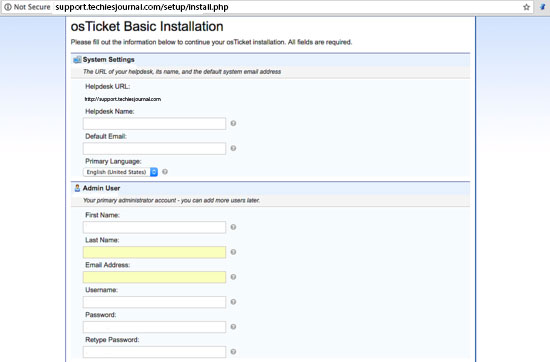
In the ‘System Settings’, type your ‘HelpDesk Name’ and the default email address. In the ‘Admin User’ section, type in your admin configuration including admin email, and make sure the email is the different from the default helpdesk email.
In the database settings, just fill in the details of our database created
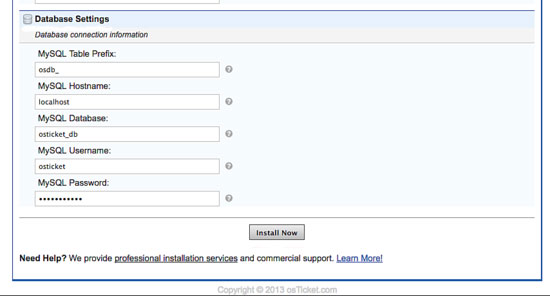
Click ‘Install Now’ and wait a sec for the installation.
cd /var/www/osticket/upload/
Remove or rename the setup directory and change the permission of the osticket config file
mv setup/ setup-sh/
chmod 0644 include/ost-config.php
OSTicket Installation is finished
7. URLs
OSTicket home page – http://support.techiesjournal.com/
OSTicket admin login – http://support.techiesjournal.com/scp/
OSTicket Admin panel configuration – http://support.techiesjournal.com/scp/settings.php
Please click here for OSTicket wiki
Please mail me for configuration queries.